 A 6502-based machine, built from a kit
when I was electronics lab technician at school.
Must have been about 1979, shortly after the school acquired a Commodore PET.
A 6502-based machine, built from a kit
when I was electronics lab technician at school.
Must have been about 1979, shortly after the school acquired a Commodore PET.
A 6502-based machine, built from a kit
when I was electronics lab technician at school.
Must have been about 1979, shortly after the school acquired a Commodore PET.
Another 6502-based machine, built from a kit. Still working 41 years later. This machine is the basis of my own Compukit UK101 web site.
A college course project, based on the Z80 and built using wire-wrap. I never really got enthusiastic about it, largely because of the Z80 processor. All project work at the time was required to be based on the Z80, but I'm a Sixer, so I never liked it. It was supposed to be initially just a Z80 with some memory and a serial port, then you could add a matrix keyboard and a video circuit to make a terminal.
Oh how dull, a 386 PC clone. I put a motherboard in a box; how can that count as building a computer? Anyway, it's junked now, having never run a single byte of true 32-bit code in its life. I still have the motherboard, in the loft, and an AT-style mini tower case that I painted black.
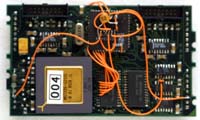
 I've always liked the M212, it's my favourite transputer.
So, I used an M212 to build a
QIC-02
tape drive interface.
The M212 was a transputer with a built-in MFM disk drive controller.
But it had a mode switch that could change the disk controller into simply
a pair of parallel ports, right on the CPU chip.
I used it in that parallel port mode with one port used as the QIC-02
data bus and the other for all the handshaking and control signals.
I wrote an occam program to drive it all, which booted over a transputer
link (from an Atari ST) and ran in the M212's internal 2k memory.
That 2k included a 512-byte tape block buffer!
I've always liked the M212, it's my favourite transputer.
So, I used an M212 to build a
QIC-02
tape drive interface.
The M212 was a transputer with a built-in MFM disk drive controller.
But it had a mode switch that could change the disk controller into simply
a pair of parallel ports, right on the CPU chip.
I used it in that parallel port mode with one port used as the QIC-02
data bus and the other for all the handshaking and control signals.
I wrote an occam program to drive it all, which booted over a transputer
link (from an Atari ST) and ran in the M212's internal 2k memory.
That 2k included a 512-byte tape block buffer!
Looking at that chip and the tape drive interface design today, the M212 looks rather like a microcontroller. At least, it could be used in a microcontroller mode (it has features such as an external data and address bus, which make it unlike a microcontroller). If I were to design a QIC-02 interface today, I'd probably use a microcontroller like the Atmel AVR ATmega8 or Atmega32.
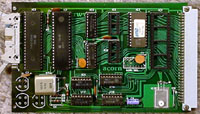
 For Submetrix, I put together a design for a T225-based four-port
serial
TRAM.
We used them for a while in the sonar systems as interfaces to
the GPS
navigation receiver and the motion reference unit.
I chose a Philips four-channel
UART
chip connected to the T225's external bus, along with some
SRAM.
The driver software booted the transputer via a link, and then sent the
serial data in and out via the same link.
For Submetrix, I put together a design for a T225-based four-port
serial
TRAM.
We used them for a while in the sonar systems as interfaces to
the GPS
navigation receiver and the motion reference unit.
I chose a Philips four-channel
UART
chip connected to the T225's external bus, along with some
SRAM.
The driver software booted the transputer via a link, and then sent the
serial data in and out via the same link.
For Mobile Bristol, I worked on some prototype PIC 16F876 designs. They were built as plug-together wearable computers as part of the research project. The master PIC was connected to the host (an HP iPaq) via a serial port, and slave CPUs were attached to it via an I2C bus. Having done that, I've decided that the PIC must be an “Eight” processor, because I didn't like it.
In my new job, I was asked to build a small embedded system around a microcontroller chip. After using the PIC previously, I decided to use an Atmel AVR chip this time. The little circuit went together pretty well, and connected up nicely to a PC's serial port. I have loaded it with code written in assembler as well as code compiled from C (with the WinAVR package, a version of GCC). I also built an AVR-based kit from EDTP which combined an ATmega16 microcontroller with an ethernet chip.
 Just for fun, I bought a ready-made Atmel AVR board that was designed
for use as a robot controller.
It has an ATmega8 chip, plus a clock crystal, reset button and
programming connector.
So far, it's just been plugged into a solderless breadboard, but I've
managed to get it doing some whacky things (entirely in assembler).
I've connected an
HP
four-digit alphanumeric display (HPDL-1414),
a Super Nintendo joypad,
a radio-control servo, a
DC
motor and an
LCD module.
I think the next things to add will be an analog voltage-divider
for push-button control and an
MMC interface.
Well, after all that, I think the AVR chip is definitely a "Six".
Just for fun, I bought a ready-made Atmel AVR board that was designed
for use as a robot controller.
It has an ATmega8 chip, plus a clock crystal, reset button and
programming connector.
So far, it's just been plugged into a solderless breadboard, but I've
managed to get it doing some whacky things (entirely in assembler).
I've connected an
HP
four-digit alphanumeric display (HPDL-1414),
a Super Nintendo joypad,
a radio-control servo, a
DC
motor and an
LCD module.
I think the next things to add will be an analog voltage-divider
for push-button control and an
MMC interface.
Well, after all that, I think the AVR chip is definitely a "Six".

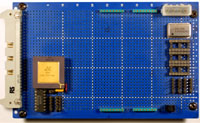
 Another fun project, again using an Atmel AVR microcontroller chip.
This board is loosely based on the
Arduino.
I've arranged the board so that I can plug in small daughterboards
with
LEDs,
switches, motor drivers, and so on.
The connectors also supply power (12, 5, 3.3 and -12 volts).
Future plans are for a dual
DAC
board and an LCD board.
Another fun project, again using an Atmel AVR microcontroller chip.
This board is loosely based on the
Arduino.
I've arranged the board so that I can plug in small daughterboards
with
LEDs,
switches, motor drivers, and so on.
The connectors also supply power (12, 5, 3.3 and -12 volts).
Future plans are for a dual
DAC
board and an LCD board.
Photos on Flickr
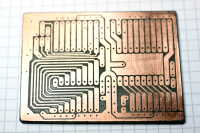
 I read about the Toner Transfer
PCB
technique, and I wanted to have a go.
I have plenty of copper-clad board from way back in the 1970s, I have
ferric chloride etchant, and I have a laser printer.
All I needed was a design, and the Atmel AVR seemed like a good chip to base it on.
Then, I spotted the
Evil Mad Scientist Labs business card PCB
and I realised that this was what I wanted to build.
But the original card was not designed for toner transfer,
and I could see some ways to improve the design,
so I made a version of my own,
and that's what you see in the photos here.
I read about the Toner Transfer
PCB
technique, and I wanted to have a go.
I have plenty of copper-clad board from way back in the 1970s, I have
ferric chloride etchant, and I have a laser printer.
All I needed was a design, and the Atmel AVR seemed like a good chip to base it on.
Then, I spotted the
Evil Mad Scientist Labs business card PCB
and I realised that this was what I wanted to build.
But the original card was not designed for toner transfer,
and I could see some ways to improve the design,
so I made a version of my own,
and that's what you see in the photos here.
Photos on Flickr
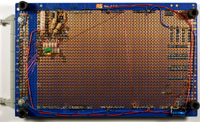
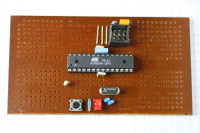
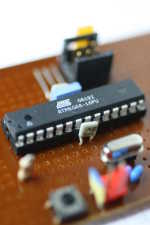
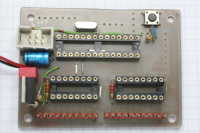
 When I got the parts for the ATmega8 boards, I also got an ATmega32,
which is a rather more powerful AVR chip.
It has four 8-bit I/O ports, and it's in a 40-pin
DIL
package.
I went ahead and built another prototyping board for the ATmega32,
again using a toner transfer PCB.
This board is still in use,
but fitted with an Atmel ATmega1284P chip.
I use it to run the ATmega1284P code in my
avrTest
repository.
When I got the parts for the ATmega8 boards, I also got an ATmega32,
which is a rather more powerful AVR chip.
It has four 8-bit I/O ports, and it's in a 40-pin
DIL
package.
I went ahead and built another prototyping board for the ATmega32,
again using a toner transfer PCB.
This board is still in use,
but fitted with an Atmel ATmega1284P chip.
I use it to run the ATmega1284P code in my
avrTest
repository.
Photos on Flickr
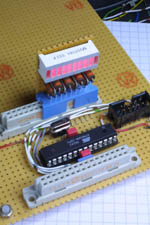
 Not satisfied with just one more toner transfer PCB, I made two.
The second board is for a
persistence-of-vision (POV) wand,
basically just 16 green LEDs that are controlled by the ATmega8.
To use fewer I/O pins on the ATmega8, I used a pair of 74LS595
shift register chips to actually drive the LEDs.
I also used surface-mount (SMT) resistors to make the PCB smaller,
although the chips are still in
DIL form.
There's also a low-dropout 5V regulator on the board, based on the
LM2941CT chip.
But having read a bit more about the AVR chips, and the 74HC595, I think
it should be possible to eliminate the 5V regulator and run the circuit
directly off two 1.5V AA batteries.
Maybe I'll try that one day, but I'd need to change all those 220Ω
SMT resistors...
Not satisfied with just one more toner transfer PCB, I made two.
The second board is for a
persistence-of-vision (POV) wand,
basically just 16 green LEDs that are controlled by the ATmega8.
To use fewer I/O pins on the ATmega8, I used a pair of 74LS595
shift register chips to actually drive the LEDs.
I also used surface-mount (SMT) resistors to make the PCB smaller,
although the chips are still in
DIL form.
There's also a low-dropout 5V regulator on the board, based on the
LM2941CT chip.
But having read a bit more about the AVR chips, and the 74HC595, I think
it should be possible to eliminate the 5V regulator and run the circuit
directly off two 1.5V AA batteries.
Maybe I'll try that one day, but I'd need to change all those 220Ω
SMT resistors...
Photos on Flickr
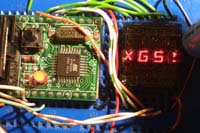
While working at Lobster Pictures, I designed and built a time-lapse camera controller around first the ATmega328, and later the ATmega1284. It used a GSM module to send and receive SMS text messages.
Another ready-made module,
but this time with a Philips/NXP ARM microcontroller: the LPC2119.
Mounted on a modified solderless breadboard,
programmed via the built-in bootloader and a serial cable.
I connected it up to an ILI9341 colour LCD.
Photos on Flickr
The very inexpensive LaunchPad evaluation module from Texas Instruments.
I connected the MSP430G2231 to an LCD from a Nokia 1202 mobile phone.
The resolution is 96x68,
which is a little better than the usual 84x48 of a 3110 LCD.
Photos on Flickr
Back to a microprocessor-based machine this time,
built from a kit as I did with the
UK101,
we have the
RC2014.
I bought just the PCB for this one,
having all the other parts in stock already.
I wrote a diagnostic and monitor program for it in Z80 assember,
in my GitHub repo RC2014tester.
Photos on Flickr
Having used the Atmel/Microchip ATtiny1616 in a robot leg project at at work,
I quite liked the chip,
which is part of the new One-Series.
I bought some chips,
with the intention to design a PCB for them.
Meanwhile,
I have soldered the ATtiny1616 to a DIL break-out board and programmed it as part of
avrTest repo on GitHub.
No photos of this one yet.
Amidst all the gloom and doom about chip shortages and supply-chain woes,
I bought a few Atmel AVR microcontrollers to add to my
avrTest repo on GitHub.
This one is the ATmega4809,
which is in a QFP-48 (0.5mm pitch) surface mount package.
It's a Zero-Series ATmega microcontroller with four serial UARTs.
Photo on Flickr
An evaluation module with built-in programmer from Atmel/Microchip.
I've been coding on it using the Microchip MPLAB X IDE and the XC32 compiler.
The source code is
on GitHub in my SAMD21blinky repo.
Photo on Flickr
Not satisfied with simply using a ready-made Curiosity Nano,
and frustrated by the chip supply-chain troubles,
I found a SAMD21E18A in TQFP-32 and soldered it to another inexpensive break-out PCB.
I don't have it running any firmware yet, though.
Photo on Flickr
I've always wanted to design and build a 6809-based machine. I now have a fair number of 6809 chips (2MHz bus versions from Motorola and ST Microelectronics) as well as some rare Hitachi HD6309 chips and the required RAM, EPROM and I/O chips. Maybe this one'll get built after all...
I bought a 68020 development kit way back in 1986 with the intention of building a machine around that chip. Of course, I never did, mainly due to lack of spare time now that I have a career in the computer industry. I still have the chip, though, and modern CAD might just make a 68020 design feasible.
Return to John Honniball's home page
Copyright © 2007-2021 by John Honniball. All rights reserved.